Archive for the ‘iPhone’ Category.

iPhone sync hangs on “Syncing (Step 2 of 4) — Preparing to sync”

If you are like me (and you know you are), I like to regularly sync my iPhone to my MacBook Pro. This is mainly just for tracking what music I listen to, as I do not do backups to my local computer any more.

Alas, there is a fly in the ointment. Lately I have been plugging my iPhone into my MBP, and then from Finder I click on the iPhone on the left and click the Sync button, and along the bottom it stays at “Syncing (Step 2 of 4) — Preparing to sync” and never moves. Here is an example of what it looks like: (You’ll forgive me if I redact some of the more sensitive bits here.)

By the way, this is an Apple Silicon MBP and it is on the latest Sonoma.

I have a solution that seems to work for me, but keep in mind that your mileage may vary, especially since the workaround that I am talking about involves terminating a system process.

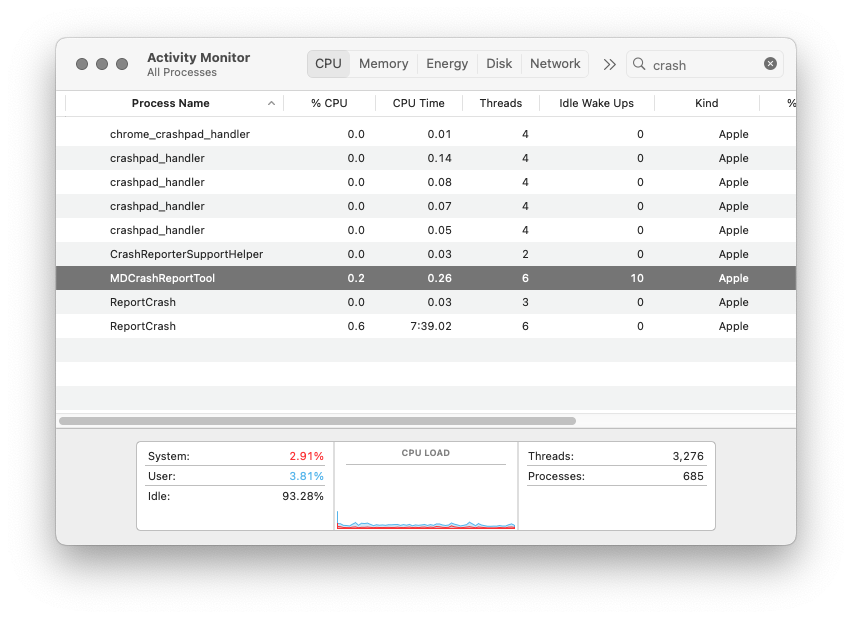
So as it turns out, there is a system process running called “MDCrashReportTool” that is somehow interfering with this process. The way that I have been able to get this to complete is to launch the Activity Monitor, then from the CPU tab search for “crash”, and your window will then look something like this:

Double click on the MDCrashReportTool entry, and from the dialog that pops up click Quit, and then click Force Quit. Once you do this, your sync should go through without incident, even if it was hung on step 2 of 4 when you kill the MDCrashReportTool process.

You will have to do this every time you reboot the computer, as the MDCrashReportTool seems to reappear again for me.

NS_ENUM works without the typedef (sort of)

You may have heard that NS_ENUM works without the typedef (sort of). What I mean by this is that most of the time, it all just works even if you leave off the typedef on something like this:

NS_ENUM(NSInteger, BinaryItemType)
{
    BINARY_ITEM_TYPE_CONTACT_PHOTO = 0,
    BINARY_ITEM_TYPE_SIGNATURE_DATA,
    BINARY_ITEM_TYPE_BUSINESS_CARD,
};

However, if I ran into a situation where I did something to my code base to cause it to start throwing build errors like this:

duplicate symbol _BinaryItemType in:
    /Users/abc/Library/Developer/Xcode/DerivedData/xyz-bultlvoaxhkekcflkuawzlgzhwyq/Build/Intermediates/xyz.build/Debug-iphonesimulator/xyz.build/Objects-normal/x86_64/XYZViewController.o
    /Users/abc/Library/Developer/Xcode/DerivedData/xyz-bultlvoaxhkekcflkuawzlgzhwyq/Build/Intermediates/xyz.build/Debug-iphonesimulator/xyz.build/Objects-normal/x86_64/Contact+PDF.o
ld: 15 duplicate symbols for architecture x86_64
clang: error: linker command failed with exit code 1 (use -v to see invocation)

And of course, I did not realize that the typedef missing was causing this error. As soon as I changed the NS_ENUM to look like this, all went well:

typedef NS_ENUM(NSInteger, BinaryItemType)
{
    BINARY_ITEM_TYPE_CONTACT_PHOTO = 0,
    BINARY_ITEM_TYPE_SIGNATURE_DATA,
    BINARY_ITEM_TYPE_BUSINESS_CARD,
};

BTW, Happy Birthday to Rosalind Chao, who so ably portrayed Keiko O’Brien in Star Trek The Next Generation and Star Trek Deep Space Nine.

Unable to simultaneously satisfy constraints

All of a sudden, I started getting this error popping up in the console while developing my iOS 7 app:

2014-04-30 11:32:27.199 MyApp[4495:60b] Unable to simultaneously satisfy constraints.
	Probably at least one of the constraints in the following list is one you don't want. Try this: (1) look at each constraint and try to figure out which you don't expect; 
	(2) find the code that added the unwanted constraint or constraints and fix it. (Note: If you're seeing NSAutoresizingMaskLayoutConstraints that you don't
	understand, refer to the documentation for the UIView property translatesAutoresizingMaskIntoConstraints) 
(
    "<NSAutoresizingMaskLayoutConstraint:0x1946a510 h=-&- v=-&- DetailTableView:0xe39ce00.width == UIView:0x2613afd0.width - 293>",
    "<NSAutoresizingMaskLayoutConstraint:0x12ccfd50 h=--& v=-&- H:[UITransitionView:0x12ca7570(768)]>",
    "<NSAutoresizingMaskLayoutConstraint:0xcf18c40 h=-&- v=-&- UIView:0x2613afd0.width == ADTransitionView:0xcf16f20.width - 768>",
    "<NSAutoresizingMaskLayoutConstraint:0xcf19bb0 h=-&- v=-&- ADTransitionView:0xcf16f20.width == UITransitionView:0x12ca7570.width>"
)
 
Will attempt to recover by breaking constraint 
<NSAutoresizingMaskLayoutConstraint:0x1946a510 h=-&- v=-&- DetailTableView:0xe39ce00.width == UIView:0x2613afd0.width - 293>
 
Break on objc_exception_throw to catch this in the debugger.
The methods in the UIConstraintBasedLayoutDebugging category on UIView listed in <UIKit/UIView.h> may also be helpful.

A few notes about the app:

1. I am still a noob when it comes to Auto Layout, so I have been kind of easing into it on some of the less critical areas of the app, but the part of the app in question is still all springs and struts.
2. I am using the ADTransitionView library to do customized view controller transitions.
3. It did not do this until this morning.

If I hit continue a couple of times on the debug console, the app moves along as if there is no problem, so this is not a critical issue, but I still wanted to find out how to take care of this issue first, and then try to figure out what triggered it.

The way that I was able to get around the issue was to look at all of the nib files that make up my view controller, table view, and cells. I found that one of the component nib files was still flagged to use Auto Layout, even though there were no constraints of any kind in that nib file. When I turned off the Auto Layout flag on that file and ran the app, it started to transition between view controllers without the ‘Unable to simultaneously satisfy constraints’ message.

BTW, Happy Birthday to Phil “Scrap Iron” Garner, who was an infielder for the Pittsburgh Pirates in the late 70’s and early 80’s.

NSString to UIImage

I had the need to take a regular old NSString and get a UIImage representation of that text. It seems like a relatively straightforward thing to do, so here is the code that I put together:

+ (UIImage *)imageWithView:(UIView *)view
{
    UIGraphicsBeginImageContextWithOptions(view.bounds.size, NO, 0.0);
    [view.layer renderInContext:UIGraphicsGetCurrentContext()];
    UIImage *img = UIGraphicsGetImageFromCurrentImageContext();
    UIGraphicsEndImageContext();
    return img;
}
 
+ (UIImage *)imageWithString:(NSString *)theString font:(UIFont *)theFont color:(UIColor *)theColor
{
    UILabel *tempLabel = [[UILabel alloc] initWithFrame:CGRectZero];
    tempLabel.backgroundColor = [UIColor clearColor];
    tempLabel.textColor = theColor;
    tempLabel.font = theFont;
    tempLabel.text = theString;
    [tempLabel sizeToFit];
 
    return [self imageWithView:tempLabel];
}

As an added bonus, if you happen to be using Font Awesome in your iOS project (and let’s be honest, if you aren’t, you should be), here is a bonus method:

+ (UIImage *)imageWithFontAwesomeIcon:(NSString *)faIcon fontSize:(CGFloat)fontSize color:(UIColor *)fontColor
{
    return [self imageWithString:[NSString fontAwesomeIconStringForIconIdentifier:faIcon]
                            font:[UIFont fontWithName:kFontAwesomeFamilyName size:fontSize]
                           color:fontColor];
}

BTW, Happy Birthday to Brian Setzer, who is a fantastic guitar player and singer.

UITextView font in IB not respected

One thing that I found to be a bit odd is that, with the latest Xcode 5 and iOS 7 SDK, if you create a UITextView inside of a UITableViewCell in Interface Builder, and change the font of the text view, it will not use your changed font in the simulator or on a device. After checking with Stack Overflow, I found that if I ticked the Selectable property for my UITextView, all of a sudden it started to respect the new font that I had selected. I am not sure if that is a bug or by design, anyone have any ideas or cite documentation one way or the other?

BTW, Happy Birthday to Leonard Nimoy. Live long and prosper.

Use NIB-based UITableViewCell properly

I like to create my complex UITableViewCell objects in their own NIB files, as it helps me keep things well organized. Unfortunately, I felt like I was not able to use NIB-based UITableViewCell properly, as the implementation of this was always a bit clunky in my opinion, since I was relegated to doing something like this:

- (UITableViewCell *)tableView:(UITableView *)tableView cellForRowAtIndexPath:(NSIndexPath *)indexPath
{
    NSString *CellIdentifier = @"CellIdentifier";
 
    UITableViewCell *cell = [tableView dequeueReusableCellWithIdentifier:CellIdentifier];
    if (cell == nil) 
    {
        [[NSBundle mainBundle] loadNibNamed:@"MyCustomCell" owner:self options:NULL];
        cell = myCustomCell;
        self.myCustomCell = nil;
    }
 
    // do something here with the cell
 
    return cell;
}

Ugh, this was a bit messy. You had to make sure that your MyCustomCell.xib file had the file’s owner pointing back to your view controller class, and that you set up an IBOutlet to the cell.

The ability to take a project and require the latest version of iOS can be a refreshing thing, as it allows one to come up to the latest APIs and practices without having to maintain painful backward compatibility. Just such a thing happened today as I learned about the proper way to use a UITableViewCell from a NIB file.

This process involves registering a class or NIB file to work with a UITableView, hooked in through the cell identifier. To set up this registration, you would do something like this in your viewDidLoad method:

UINib *nib = [UINib nibWithNibName:@"MyCustomCell" bundle:nil];
[_theTableView registerNib:nib forCellReuseIdentifier:CellIdentifier];

(Just make sure to set up your CellIdentifier NSString variable as a global in the class or as a static in the same area that you register the NIB.) And then, the cellForRowAtIndexPath method has a little less heft to it:

- (UITableViewCell *)tableView:(UITableView *)tableView cellForRowAtIndexPath:(NSIndexPath *)indexPath
{
    UITableViewCell *cell = [tableView dequeueReusableCellWithIdentifier:CellIdentifier];
 
    // do something here with the cell
 
    return cell;
}

Because you have registered the NIB file with the cell identifier on your table view, the dequeueReusableCellWithIdentifier method knows how to either reuse or create a cell without having to explicitly do it in code. I like less heft.

BTW, Happy St. Patrick’s Day to everyone, Irish and non-Irish alike. Please be safe out there and don’t do anything dumb, which is actually a good rule to live by the other 364.24 days of the year as well.

Core Data error: The operation couldn’t be completed. (Cocoa error 19.)

Well, it has been over a year since I last had a customer with a corrupted database problem. Which means that I guess I was overdue. And what problem it is.

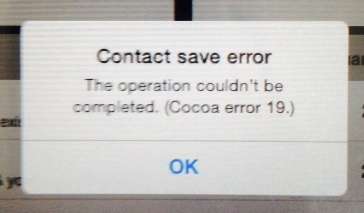
My customer is reporting that they now get the following error on their iPad when they try to do something with their database:
cocoa_error_19

Just in case you can’t read the text in the photo, it says:

The operation couldn’t be completed. (Cocoa error 19).

After some trouble getting the file (it is over 4 GB, not easy to e-mail), I saw a bunch of errors pop up in my debug console, including the dreaded “The database disk image is malformed”, which to me indicated that I needed to try and repair the database file. So I punched up my blog post from February of last year to try and run a repair on it.

Unfortunately, I ran into one dead end after another. I was able to dump the data out of the original database file, which produced a text file of over 8 GB. However, no matter what I tried to do to import this data back into a new database, I would end up with an empty new database.

On a lark, I decided to switch to Windows to try and fix the database file. After downloading the tools from the SQLite web site, Here is what I ended up with on my Windows computer:

C:\database>dir
 Volume in drive C is Windows7_OS
 Volume Serial Number is 50B0-39AA
 
 Directory of C:\database
 
03/14/2014  06:27 PM    <DIR>          .
03/14/2014  06:27 PM    <DIR>          ..
03/14/2014  06:16 PM     4,251,181,056 DB.sqlite
03/11/2014  11:33 AM           536,064 sqlite3.exe
03/11/2014  11:34 AM         1,388,032 sqlite3_analyzer.exe
               3 File(s)  4,253,105,152 bytes
               2 Dir(s)  240,466,235,392 bytes free

So I fired up a command prompt and tried to run some SQLite commands:

C:\database>sqlite3
SQLite version 3.8.4.1 2014-03-11 15:27:36
Enter ".help" for usage hints.
Connected to a transient in-memory database.
Use ".open FILENAME" to reopen on a persistent database.
sqlite> .open DB.sqlite
sqlite> .tables
.
.
Some table names listed here
.
.
sqlite> pragma integrity_check;
*** in database main ***
On tree page 1033353 cell 0: Failed to read ptrmap key=-280958431
On tree page 1033353 cell 0: 152 of 407 pages missing from overflow list starting at 1037333
Page 1037588 is never used
Page 1037589 is never used
.
.
You get the idea...
.
.
Page 1037684 is never used
Page 1037685 is never used

After going through the series of steps that I outlined in my message from last year, it appeared to process the 8 GB text file into a new database that was almost the same size as the original database file. Here was what my directory then looked like:

C:\database>dir
 Volume in drive C is Windows7_OS
 Volume Serial Number is 50B0-39AA
 
 Directory of C:\database
 
03/14/2014  06:45 PM    <DIR>          .
03/14/2014  06:45 PM    <DIR>          ..
03/14/2014  06:41 PM     8,428,761,778 dump_all.sql
03/14/2014  06:16 PM     4,251,181,056 DB.sqlite
03/14/2014  06:45 PM     4,239,932,416 DB2.sqlite
03/11/2014  11:33 AM           536,064 sqlite3.exe
03/11/2014  11:34 AM         1,388,032 sqlite3_analyzer.exe
               5 File(s) 16,921,799,346 bytes
               2 Dir(s)  227,795,791,872 bytes free

This had me feeling pretty good. Just to check, here is what I did next:

C:\database>sqlite3 DB2.sqlite
SQLite version 3.8.4.1 2014-03-11 15:27:36
Enter ".help" for usage hints.
sqlite> .tables
.
.
Some table names listed here
.
.
sqlite> select count(*) from table_name;
8716
sqlite> pragma integrity_check;
ok
sqlite> vacuum;
sqlite> .exit

It looks like success. I will have to take this data file and put it back on one of my test iPads when I get back into the office and try it out.

BTW, Happy Pi Day to everyone out there, whether you are a math person or not.

ADDENDUM: After putting the rebuilt SQLite database file back onto my own test iPad and simulator, it worked fine with no issues or cryptic error messages.

UIPopoverController arrow displays incorrectly on iOS 7

This one still doesn’t make sense to me, but I need to put it to bed and move on. When retooling an app for the latest iOS SDK, the UIPopoverController arrow displays incorrectly on iOS 7 in certain instances.

In the case where I need to display a popover controller as the result of the user tapping on a cell in a UITableView, this code has always worked fine in my iPad applications:

[thePopover presentPopoverFromRect:cell.frame inView:theTable permittedArrowDirections:UIPopoverArrowDirectionLeft animated:YES];

However, after I switched over to using the iOS 7 SDK, the results look like this now:

popover_arrow_incorrect

After a bunch of investigations, I decided to try this just for the heck of it:

CGRect rect = CGRectMake(CGRectGetMaxX(cell.bounds) * 0.9, CGRectGetMidY(cell.bounds), 1.0, 1.0);
[thePopover presentPopoverFromRect:rect inView:cell permittedArrowDirections:UIPopoverArrowDirectionLeft animated:YES];

With this code change, it now it looks like this:

popover_arrow_correct

And I am happy once again. Although I would still like to know why the original code does not work, if anyone has any ideas please feel free to comment. As you can see from the first image, the popover is positioned correctly (notice the vertical placement of the two line table view inside the popover, it is showing the same in both examples), it is just the arrow that is drawn incorrectly.

BTW, Happy Birthday to Tim Kazurinsky, who was great in his all-too-brief stint on Saturday Night Live, and utterly fantastic in the Police Academy series of films.

Extra space in grouped UITableView on iOS 7

So I noticed that there is a lot of extra space at the header and footer of my UITableView that is in my current project that I am updating to iOS 7. After some frustration, I finally put together this category that I hung off of UITableView:

- (void)ios7Check
{
    if (SYSTEM_VERSION_GREATER_THAN_OR_EQUAL_TO(@"7.0"))
    {
        self.tableHeaderView = [[UIView alloc] initWithFrame:CGRectMake(0.0f, 0.0f, self.bounds.size.width, 4.0f)];
        self.tableFooterView = [[UIView alloc] initWithFrame:CGRectMake(0.0f, 0.0f, self.bounds.size.width, 4.0f)];
    }
}

Basically, all you have to do is call this from the viewDidLoad method of your view controller (or table view controller), and fire the ios7Check method like this:

[_theTableView ios7Check];  // if you have an instance variable pointing to your table view

or:

[self.tableView ios7Check];  // if your view controller is a UITableViewController

And you can adjust the spacing of the header and footer by changing the 4.0f values in the method above.

Here is what the grouped table view looks like without the code above, and with the code:

ios7-tableview-header-bigios7-tableview-header-small

EDIT: By the way, don’t try to set your tableHeaderView or tableFooterView frame to a height of 0.0f, as if you do then it just puts in the extra space. It must be that the Cocoa Touch framework sees that you have a zero height view, and just considers it as null. Even a height value of 0.1f is good enough, if you want a table view that cozies right up to the top with no space in between.

BTW, an anniversary farewell to Nelson Briles, who was a pitcher for the Pittsburgh Pirates (and other teams), and was a founding figure of the Pirates Fantasy Camp. Unfortunately he passed away on this day in 2005, so I did not get to meet him since my first Fantasy Camp was in 2011.

Determine which UITableViewCell contains a specified UIControl

If you have UITextField controls inside of a table view cell, and you are hooked into one of the UITextFieldDelegate methods, then you might need to determine which UITableViewCell contains a specified UIControl inside of a delegate method.

The wrong way

Up until now, I have always taken the shortcut of just walking back to the grandparent of the control by doing something like this:

- (BOOL)textFieldShouldEndEditing:(UITextField *)textField
{
    UITableViewCell *cell = (UITableViewCell *)textField.superview.superview;
 
    // do something here with the cell
 
    return YES;
}

However, when building and running under the iOS 7 SDK, this of course does not work any more.

The right way

After researching this phenomenon a bit more, I found a solution that does not rely on walking the view hierarchy, which by the way kids, is usually never a good idea. Here is a category that I built on top of UIView:

- (UITableViewCell *)findParentCellInTableView:(UITableView *)tableView
{
    UITableViewCell *cell = [self findParentUITableViewCell];
    return cell;
}
 
- (UITableViewCell *)findParentUITableViewCell
{
    if (self.superview && [self.superview isKindOfClass:[UITableViewCell class]])
    {
        return (UITableViewCell *)self.superview;
    }
 
    return [self.superview findParentUITableViewCell];
}

As a result, now my delegate call looks like this:

- (BOOL)textFieldShouldEndEditing:(UITextField *)textField
{
    UITableViewCell *cell = [textField findParentCellInTableView:tableView];
 
    // do something here with the cell
 
    return YES;
}

Since I built this category off of UIView, it will work with most common items built on top of UIView or UIControl that you would put in a table view cell, such as UILabel, UITextField, UITextView, etc.

BTW, Happy Anniversary to The Beatles, who first visited the United States 50 years ago today.

EDIT: My first attempt to create the findParentCellInTableView method ended in disaster, as I forgot to take into account the fact that table view cells can scroll off the screen and possible get reused. As a result, I created a method that walks up the view chain more intelligently than simply going to the superview’s superview. As always, please let me know if you have any comments.