Posts tagged ‘Windows’

Organizing a family photo collection using PowerShell, part 2

Just to recap from last month’s post, I have been given the chore of… Organizing a photo collection.

The files were on several computers and backups, so PowerShell on Windows 10 became the main vehicle with which I would try to bring this beast under control.

Plan for organizing a photo collection

  1. Bring photos together from all sources into one place
  2. Remove duplicate photos
  3. Organize photos by month and year

Step 3

Here is the PowerShell script that I used to organize the photos into folders by month and year. (WARNING: Any time you set up any kind of automated file process, make sure that you have backups.)

function fmove($SourceDir,$DestinationDir)
{
	$files = Get-ChildItem $SourceDir
	foreach ($file in $files) 
	{
		$Directory = $DestinationDir + "" + $file.LastWriteTime.Date.ToString('yyyy') + " " + $file.LastWriteTime.Date.ToString('MM')
		if (!(Test-Path $Directory))
		{
			New-Item $directory -type directory -Verbose
		}
		Move-Item $file.fullname $Directory -Verbose
	}
}
 
fmove -SourceDir "C:\Users\Me\Desktop\IntermediateDestination\" -DestinationDir "C:\Users\Me\Desktop\FinalDestination\"

There is not much going on here. The scripts iterates through all files in the source directory. For each individual file, there is a check to see if a folder exists with the last write year and month, creating it if necessary. And finally, the individual file is moved to that folder.

Once this script finishes, you will have a bunch of folders with files in them corresponding (roughly) to their date. However, please keep in mind that this might not be accurate if the files have been processed by other software.

BTW, Happy Birthday to the two dollar bill, issued on this date in 1976 to correspond with Thomas Jefferson’s birthday.

Organizing a family photo collection using PowerShell, part 1

If you are the only able bodied IT professional in a family, it means that you will be tasked with all sorts of demeaning and inane computer software and hardware questions, recommendations, and maintenance duties. Eventually, if you remain the solo IT person in a family long enough, you will be asked to perform one of the most daunting and thankless chores known to man… Organizing a photo collection.

You may be the only IT person in the family, but everyone else in the family has computers, digital cameras, and cell phones. All of these devices are capable of taking, storing, and more to the point, hiding digital imagery. And all of which have done so with varying degrees of success, which makes the job seem even more challenging.

Well friends, I am here to help. Recently I had to go through this very process with the myriad devices in use by my family. Instead of putting it off and grumbling about it, I decided to think this through and conquer the photo collection once and for all.

They had several different machines that were used to hold pictures, along with some backups of older machines that also had pictures on them. On the surface it seems like you would never be able to untangle the mess, but I thought about it for a few minutes and decided to apply the “divide and conquer” method to this conundrum. At my job, I have gained a newfound appreciation of PowerShell on Windows 10, so I decided to use PowerShell as a key component to my evil plans.

Plan for organizing a photo collection

  1. Bring photos together from all sources into one place
  2. Remove duplicate photos
  3. Organize photos by month and year

Now item #1 above sounds a bit easy at first glance. However, you have to keep in mind that cameras use names such as IMG_2209.JPG as the file names created. As a result, if you have taken a lot of photos with a lot of different cameras, you can get name collisions on files.

So first I needed to do was to get all of the backups and files from the disparate sources into one folder on my Windows 10 computer. Then, I would go through and find all the JPG files in the source location recursively one at a time, check to see if the file name exists in the destination, and if it does, add a number to it until it is unique, then copy the file to the destination. This would of course leave some duplicates in the destination that will be handled later.

Step 1

Here is the PowerShell script that I used to perform this task. (WARNING: Any time you set up any kind of automated file process, make sure that you have backups.)

function fcopy ($SourceDir,$DestinationDir)
{
	Get-ChildItem $SourceDir -Recurse | Where-Object { $_.PSIsContainer -eq $false } | ForEach-Object ($_) {
		$SourceFile = $_.FullName
		$DestinationFile = $DestinationDir + $_
		if (Test-Path $DestinationFile) {
			$i = 0
			while (Test-Path $DestinationFile) {
				$i += 1
				$DestinationFile = $DestinationDir + $_.basename + " " + $i + $_.extension
			}
		}
		Copy-Item -Path $SourceFile -Destination $DestinationFile -Verbose -Force
	}
}
 
fcopy -SourceDir "C:\Users\Me\Desktop\Source\" -DestinationDir "C:\Users\Me\Desktop\IntermediateDestination\"

In the last line of this script, you would fill in your source and destination directory. In my case, I had already pruned all of the files that were not JPG files out of all the source directories. If you do not do that, you would end up with file types you could then delete from the destination.

Step 2

Eventually the PowerShell script will finish, and you will have all your files in one folder. I then used a freeware Windows application that can go into a specified folder and find duplicate files. It then shows you which files it found as duplicates, and you can quickly delete all the unneeded duplicates. You should be able to find something workable with an internet search for duplicate file finder.

And finally, I highly recommend using the PowerShell ISE to work on and run your PowerShell script. It makes things go much smoother and can help you with any kind of questions or issues.

Please make sure to check back for my next installment of organizing a photo collection. I will cover how I massaged this massive file list into a more manageable structure. The folders wlll be organized by month and year that the picture was taken.

BTW, sort of in keeping the theme of today’s post, I hope everyone has a happy World Backup Day. In addition to being April Fool’s Day, tomorrow is also a good candidate for World Restore Day.
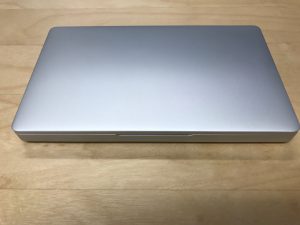
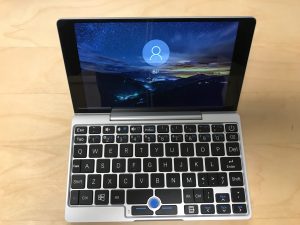
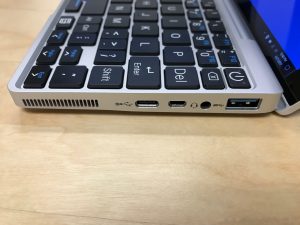
GPD Pocket review

I don’t usually do reviews, but with certain products that I think are particularly interesting or innovative, I will make an exception. As a result, here is my GPD Pocket review.

GPD Pocket: 7.0′ UMPC-Laptop with Windows 10

I saw this campaign pop up on an email to me from Indiegogo in February of this year, and thought that the idea was intriguing. So I backed the project and received the device about 4 months later, which in terms of some Indiegogo campaigns, is practically overnight. (I’m looking at you, Fusion Guitar.)

For an inexpensive device, I do like the build quality. The case is an alloy case that feels very solid and light, which hopefully translates to durability in the long run.

The screen is a 7 inch screen at a resolution of 1920×1200, and from what I have seen so far, is very good for most traditional uses. This device is not advertised as a gaming machine, so I have not tried to do anything crazy complicated with it yet.

Atom processors are notoriously sluggish, but the one in this device seems snappy enough, although the caveat again here is that I have not tried running anything challenging. I suspect that the 8 gigabytes of RAM configuration that I opted for is helping out on this front quite a bit.

On such a small device, the keyboard is always going to be a problem, and the GPD Pocket is no exception here. The biggest problem I have been having so far is that the number keys are off to the right by about one key, or in other words, on a normal keyboard, I go for the 3 key with my E finger, but on GPD Pocket, the 2 is right above E. As a result, I have to stop myself when going to the numbers row.

The one thing that I wish this device had was a MicroSD card slot to expand the device beyond the 128 gigabytes of storage that it comes with on the internal drive.

For the price that I paid (about $400 as an early adopter), I think it is a great device that I will make a lot of use of. That said, if the retail price goes up significantly from there, I am not sure if it has the same appeal.

Rating: 4 stars out of 5

Pros:

  • Compact and light
  • Good battery life
  • Good build quality

Cons:

  • Hard to touch type
  • No MicroSD card slot to expand storage

BTW, a posthumous Happy Birthday to Bob Keeshan.

Windows 8.1 Update 1 error 80073712

It can be very frustrating when you end up searching for help with a Windows Update issue. There are so many moving parts on a Windows system that it is next to impossible to track everything reliably.

While trying to put the Windows 8.1 Update 1 on my Windows 8 virtual machine inside of Parallels Desktop on my iMac, I was getting error 80073712 in the update settings control panel. There is no shortage of materials to look at if you search for that particular error code, the tricky part is finding which one will help solve the particular problem with my installation.

I was finally able to find this procedure, and it did the job as I am now running Windows 8.1 Update 1. I will abbreviate it here, for the full source material click on the link below the list:

  • Get an administrator command prompt
  • Enter this command (I am running the 64 bit version, you will need a different command to work with 32-bit or Win 8 RT, see the link for more information):
    dism /online /remove-package /packagename:Package_for_KB2919355~31bf3856ad364e35~amd64~~6.3.1.14
  • Enter this command:
    DISM.exe /Online /Cleanup-image /Restorehealth
  • Enter this command:
    dism /online /cleanup-image /startcomponentcleanup
  • Exit the command prompt and attempt to run the update again

Even though the 2nd command above gave me an error, I went through the whole procedure, and it worked correctly. Here is the link to the forum posting on Microsoft’s web site with the full message:

Windows 8.1 Update 1 Failing to Install with errors 80070020, 80073712 and 0x800f081f

BTW, a posthumous Happy Birthday to Bruno Kirby, who played the limo driver in This Is Spinal Tap.

Win32 EXE to service in Windows Server 2008

We had a server meltdown happen here earlier this week, and as part of the collateral damage, an automated order processing application that has been running since 2004 has been off-line. This application was written in VB6 with a minimal user interface, and as such, I have always remoted into the server, started the program up on the server and left it open, and then just closed my remote desktop application, which left the session open and running.

We wanted to change this to make it a bit more reliable, which means Windows service. Unfortunately, the application does not have the correct hooks in it that make it be able to be seen as a service. (I could create a service with the EXE name as the target, and the EXE would run when I started up the service, but it would soon crash as service manager could not find something it was looking for.)

After a little bit of digging, I found some suggestions on using the srvany.exe application as a shell to launch my application, and I must say it seems to work marvelously. Here is the link where I found the solution:

Application as a Service “srvany.exe” in Windows Server 2008

Here are the important steps from the article above (in case it relocates or disappears):

  1. At the time of this posting, there is no Windows Server 2008 Resource Kit Tools, so get the “srvany.exe ” from the “Windows Server 2003 Resource Kit Tools ” and copy it to a suitable location on your Win2008 server (e.g. C:\Windows\System32\ ).
  2. Use “sc ” to create a new service that launches “srvany ” (e.g. sc create MyService binPath= C:\Windows\System32\srvany.exe DisplayName= “My Custom Service” )
  3. Using RegEdit : create a “Parameters ” key for your service (e.g. HKEY_LOCAL_MACHINE\SYSTEM\CurrentControlSet\Services\MyService\Parameters\ )
  4. Using RegEdit : within the newly created “Parameters ” key , create a string value called “Application ” and enter the full path to the application you are wanting to run as a service. (No quotes required.)

In the article linked above, keep in mind that Parameters is misspelled at the end of item #3, I have corrected it in my item #3 above. Other than that, it seems to be working great.

Code 39

Did you ever get the dreaded “Windows cannot load the device driver for this hardware. The driver may be corrupted or missing. (Code 39)” message in your Device Manager for your DVD/CD-ROM drive?

This happened to a computer here at our office, and it did this for both the internal drive and for an external USB drive that we hooked up to it as well.

Well, to solve the problem, we found this link and ran a neat little automated program from Microsoft that went in and fixed up the drivers for both the internal and external drives.

Your CD or DVD drive can’t read or write media

Very cool. This was way easier than some of the other solutions that we were seeing.

Netbook resolution in Windows Virtual PC

A customer lets me know that they are having a problem with one of our software products. It was something specific to the 1024 by 576 pixel resolution of their Dell netbook, which was a problem since we did do not have a computer with that resolution.

So I decided to try to use the Windows XP Mode of Windows Virtual PC on my Windows 7 Ultimate dev box to simulate the netbook resolution and try the software in that virtual machine. Unfortunately, I fire up the Windows XP mode only to find that it is fixed to 1024 by 768 resolution in the display settings, with no way to change since the Advanced button is disabled and there are no other choices for the resolution slider.

After I investigated a bit, I found that I could edit the Windows XP Mode.vmc file (located in the folder C:\Users\My Name\AppData\Local\Microsoft\Windows Virtual PC\Virtual Machines, substitute your name for My Name in the path), which is an XML file. There is a ui_options section in the file, my file now contains the following 2 items:

<resolution_height type="integer">576</resolution_height>
<resolution_width type="integer">1024</resolution_width>