Posts tagged ‘C#.NET’

How to use a C# .NET interface to send messages between classes

I have used delegates in Objective-C to send message back and forth between classes for years. (And in fact, I did a blog post on Setting up an Objective-C delegate for the iPhone SDK a few years back on this very subject.) Indeed, delegates are a critical part of the Objective-C language, as it is usually good for objects to be able to let other objects know what is going on.

Well now, in my .NET development duties, I have a very similar situation. My code has a bunch of user controls that I use, and I need to have messages sent from one user control to another as the user works with the various pieces of the application.

Of course, in order to keep the compiler happy and get it working, you can do something quick and dirty like putting in an instance variable into the class that points back to your user control, and then when you need to let that user control know what is going on, just use the instance variable reference to call a method in that user control’s class.

But this is not scalable. If you have a bunch of different user controls calling a specific user control, you would have to put a reference to each different type of calling control, and then walk through them and determine which one you need to call in each case.

C# interface to the rescue. By using a C# interface, you can put an instance variable for your interface into your called class, which will then allow your calling class (which of course follows the interface) to have a method fired in it.

Here is a tutorial using C# for a console application that demonstrates the principles:

using System;
 
namespace ConsoleApplication1
{
    interface IMyClass  // 1
    {
        void PassMessage(string theMessage);
    }
 
    public class MyClass  // 2
    {
        private IMyClass parentClass;  // 3
 
        public void SetParentClass(object c)  // 4
        {
            parentClass = c as IMyClass;
        }
 
        public void Nudge()  // 5
        {
            parentClass.PassMessage("MyClass hath been nudged.");
        }
    }
 
    public class MainClass : IMyClass  // 6
    {
        public void DoStuff()  // 7
        {
            Console.WriteLine("About to DoStuff in MainClass");
            var c = new MyClass();
            c.SetParentClass(this);
            c.Nudge();
 
            Console.WriteLine("Press any key to exit...");
            Console.ReadKey();
        }
 
        public void PassMessage(string theMessage)  // 8
        {
            Console.WriteLine("Message passed from MyClass: " + theMessage);
        }
    }
 
    public class Program
    {
        static void Main(string[] args)
        {
            var mainClass = new MainClass();
            mainClass.DoStuff();
        }
 
    }
}

So let’s break this down a bit. The numbers below correspond to the comments in the code above.

1. This is the interface definition. You need to put in here a listing of the methods that you want to be calling, sort of like an abstract class.

2. This is the class definition for the called class, or the class that needs to send a message back to the calling class.

3. Here is where the reference back to the calling class is kept. Since it’s type is an interface, any object that follows that interface can receive the caller’s message.

4. In this method, I am setting the reference back to the calling class. You can do this in the constructor as well if desired.

5. The Nudge method is a method in the called class that when executed, needs to send a message back to the calling class.

6. This is the class definition for the calling class. Notice that it follows the interface above, which requires that you provide the method specified in the interface.

7. This method creates the called class and sets up the interface reference, and then sends the Nudge message to the called class, which in turn calls back by firing the PassMessage method.

8. Here is where I do the processing necessary when the calling class is sending the message.

This is a pretty trivial example, but it should give you an idea on how to start setting up more complex cases.

BTW, Happy Birthday to John Myung, the fantastically talented bass player and founding member of Dream Theater. They are playing in a town near me this spring, but unfortunately I will be out of town and unable to see them. Great sadness.
.NET regex to find strings inside curly braces

Regular expressions all by themselves have the magical ability to amaze and confound all at the same time. Throw in a dash of .NET string interpretation and you have a recipe for pulling out the remaining hair that you might have on your head.

So I was trying to use a regex to do some searching inside of a large string for strings inside curly braces, such as {this} and {these three words}. My string matching routine would return “this” and “these three words”, without the quotes of course. It took a bit of trial and error, but here is the important stuff for the routine that I put together to accomplish this task:

const string pattern = @"\{([^\}]+)\}";
foreach (Match match in Regex.Matches(theLargeString, pattern))
{
    Console.WriteLine("Found a field match: " + match);
}

BTW, a special birthday shout out to one of the mega stars of our generation, who turns 50 years young today. Happy birthday, Larry The Cable Guy.

Overriding a TargetType Style without a Key in WPF

I have been doing a lot of work in WPF lately, and it is a different animal.

The default styles of a button did not look right for my application, so I came up with the following XAML that styles up all of the button objects in my application:

<Style TargetType="{x:Type Button}">
    <Setter Property="SnapsToDevicePixels" Value="true"/>
    <Setter Property="OverridesDefaultStyle" Value="true"/>
    <Setter Property="Background" Value="CornflowerBlue" />
    <Setter Property="Template">
        <Setter.Value>
            <ControlTemplate TargetType="{x:Type Button}">
                <Border x:Name="Border" CornerRadius="0" BorderThickness="0" 
                            Background="{TemplateBinding Background}" BorderBrush="{TemplateBinding Background}">
                    <ContentPresenter Margin="2" HorizontalAlignment="Center" VerticalAlignment="Center" RecognizesAccessKey="True" />
                </Border>
                <ControlTemplate.Triggers>
                    <Trigger Property="IsMouseOver" Value="true">
                        <Setter TargetName="Border" Property="Background" Value="#4667A5" />
                    </Trigger>
                    <Trigger Property="IsPressed" Value="true">
                        <Setter TargetName="Border" Property="Background" Value="#3C588C" />
                    </Trigger>
                    <Trigger Property="IsEnabled" Value="false">
                        <Setter TargetName="Border" Property="Background" Value="LightGray" />
                        <Setter TargetName="Border" Property="BorderBrush" Value="#AAAAAA" />
                        <Setter Property="Foreground" Value="DarkGray"/>
                    </Trigger>
                    <Trigger Property="IsEnabled" Value="true">
                        <Setter Property="Foreground" Value="White"/>
                    </Trigger>
                </ControlTemplate.Triggers>
            </ControlTemplate>
        </Setter.Value>
    </Setter>
</Style>

As you can see, I am using TemplateBinding to bind to the desired background color.

However, in one of my user controls, I want to be able to change the background color of the button in certain situations. Initially, I just created a copy of the above XAML, gave it a Key, and then used that key name to style up the Buttons that I wanted to.

As always, there is a better way. I found that there was a way to use a BasedOn in my new style to pull in the style from the global resources and just change what I needed, here is what it looks like:

<Style x:Key="SpecialButton" TargetType="Button" BasedOn="{StaticResource {x:Type Button}}">
    <Setter Property="Width" Value="20" />
    <Setter Property="Visibility" Value="Collapsed" />
    <Setter Property="Content" Value=">" />
    <Setter Property="IsTabStop" Value="False" />
    <Setter Property="Background" Value="LightGray" />
</Style>

BTW, Happy Birthday to Eugene Levy, by far one of the funniest actors out there.

DBNull string field handling

Let’s say for the sake of argument that you are using a SQL Server Compact database in your C# .NET application, and your User table has nvarchar fields that are nullable, and your User class doesn’t care if those fields are null, it just wants empty strings instead.

Sadly to say, you are eventually going to end up with nulls in those fields, and as a result, if you use a SqlCeDataReader to step through a record set, this kind of stuff will (at some point) give you a runtime error:

myUser.UserName = (string)dataReader["UserName"]);

So I started looking for the best way to handle this problem. What I didn’t want to do was this for every single string field assignment:

myUser.UserName = (System.DBNull.Value == dataReader["UserName"] ? "" : dataReader["UserName"]);

This seems a bit wasteful to me, as the data reader is accessed twice. Sure, I could have encapsulated this into a function to pretty up the code a bit, but that would just be hiding the ugliness. Then, it occurred to me to try the Convert class to see what would happen, and it turns out that this code knows how to convert a DBNull to an empty string:

myUser.UserName = Convert.ToString(dataReader["UserName"]);

The Convert class may in fact do the same thing as I have shown above, but I would hope that Microsoft would make their built in function better than something that I would just hack together.

BTW, I hope everyone out there has voted, this is an important election. (Finally, tomorrow I can watch TV or get the mail without being bombarded by increasingly stupider campaign and “issue” advertisements.)

How to dynamically generate a TrackBallInfoTemplate

The Telerik ChartView control is nice, but if you cannot create your XAML ahead of time (or in other words, you don’t know how many LineSeries you are going to have on your chart), then you are in uncharted territory. Especially if you are not super solid in WPF and data binding as I am.

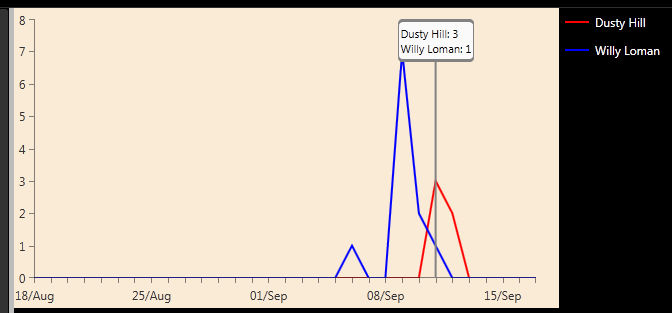
Using their example code, I was able to get the track ball info to show the date and value of the data points (basically the X and Y values of the data point), but instead I wanted to show a label for that LineSeries along with the Y value. Initially I tried to use a DataTemplate in the Resources of my user control, but I could not get the binding to work the way I wanted to.

Finally, to solve this issue, I had to resort to build the XAML in my code and set the TrackBallInfoTemplate. Here is what it looks like:

// the class holding the data for the chart...
public class SalesInfo
{
    public string Employee { get; set; }
    public DateTime Time { get; set; }
    public int Value { get; set; }
}
 
// then, further on down the code...
Color[] colorArray = { Colors.Red, Colors.Green, Colors.Blue, Colors.Yellow };
 
// and...
data = new RadObservableCollection(data.OrderBy(x => x.Time));
Color dataColor = colorArray[loopCounter % 4];
LineSeries line = new LineSeries();
line.Stroke = new SolidColorBrush(dataColor);
line.StrokeThickness = 2;
line.CategoryBinding = new PropertyNameDataPointBinding() { PropertyName = "Time" };
line.ValueBinding = new PropertyNameDataPointBinding() { PropertyName = "Value" };
line.ItemsSource = data;
 
StringBuilder templateString = new StringBuilder();
templateString.Append("<DataTemplate xmlns='http://schemas.microsoft.com/winfx/2006/xaml/presentation'>");
templateString.Append("<StackPanel Orientation='Horizontal'>");
templateString.Append("<TextBlock Text='" + u + "' />");  // u refers to the name of this line series (Employee)
templateString.Append("<TextBlock Text=': ' />");
templateString.Append("<TextBlock Text='{Binding DataPoint.Value}' />");
templateString.Append("</StackPanel>");
templateString.Append("</DataTemplate>");
 
var xml = XmlReader.Create(new StringReader(templateString.ToString()));
var tbiTemplate = (DataTemplate)XamlReader.Load(xml) as DataTemplate;
line.TrackBallInfoTemplate = tbiTemplate;
myTelerikChartView.Series.Add(line);

And so now, here is what my chart view looks like with the customized track ball info:

BTW, Happy Birthday to Ty Tabor.

EDIT: I would like to take a moment to say thanks to Yavor from Telerik, he responded to my posting on the Telerik forums and pointed out that the DataPoint object has a DataItem object child that is the object that created the DataPoint. As a result, in my XAML Resources, I can bind to DataPoint.DataItem.Employee, and it works as expected. Here is that link:

Creating LineSeries programmatically with custom TrackBallInfoTemplate

Using the new WPF themes

So I am looking around for some ideas on making this WPF based application for Windows that I am working on look slightly less sucky. And I see some nifty themes on this web page:

WPF Themes

And I am thinking that would be pretty cool to just swap in one line in the App.xaml file, and my whole app would look different.

Cool in theory, but some implementation details are a bit fuzzy.

Here is what I did to get it working with VS 2010 Ultimate:

  • Install the WPF Toolkit by clicking on the big purple “download” button on the above web site
  • Download the themes xaml files by going to this web site: WP Futures (scroll down to WP Themes and click the link to download the zip file)
  • Unzip the downloaded file and add the needed xaml files to your WPF project
  • Add a reference to WPF Toolkit in your application’s References folder
  • Add a ResourceDictionary line to the Application.Resources section of your App.xaml file to make it look like the one shown on the WPF Themes page above

Keep in mind that if you put your xaml theme files in a folder off the root of your project, you will need to adjust the Source property of the ResourceDictionary. For example, I put the xaml theme files in a Themes folder off the root of the project, so the Source for me looks like this:

<ResourceDictionary Source="/Themes/ExpressionDark.xaml" />

BTW, Happy Birthday to John Petrucci, who is quite clearly not a native of this planet.

Azure + SSL

Sorry about the delay in between posts kiddies, I have been very busy at work with Routzy and playing baseball at Pirates Fantasy Camp. Hopefully soon the Routzy app will be approved and I will be able to return to a more normal pattern of posting.

In the mean time, if you have a Windows Azure web site or services, and you want to secure them with an SSL certificate, I found this blog post to be indispensable:

Windows Azure: Secure Site with SSL certificate

BTW, a big shout out to Ohio’s own John Glenn, who, 50 years ago today, orbited the earth for almost 5 hours, a tremendous feat for the time.

Compound comparison in a LINQ join statement

I’ve been doing pretty much iPhone only postings recently, so this might change it up a bit.

So I am trying to go into our web application’s C# code to make some changes to the administration area of the web site.  (This is usually the only place I feel comfortable making changes, as this is not an area that customers actually use.)  We have a page that uses a store procedure to pull data from our SQL Server database and presents it on the page.

I needed to get more information out of the database than the store procedure was giving me, and I didn’t feel like modifying the procedure and then trying to rebuild the DBML, so I decided to convert it to a LINQ statement and bind to that instead of binding to the results of the stored procedure.

These things never go as planned.  I took a similar LINQ statement that I found in the application, but it did not do exactly what I wanted to do.  Basically, the LINQ statement I found used a simple comparison.  I needed to check for two different things in my comparison, so after a bit of research and trial and error, here is what I came up with:

var p = (from ord in dc.orders
    join ordSt in dc.orderStatus on 
        new { ord.orderID, b = true } equals new { ordSt.orderID, b = ordSt.isDeleted }
    where ord.customerID == custID
    select
        new { ord.orderID, ordSt.deletionDate } );

I had to add the little “b = true” and “b = ordSt.isDeleted” parts because it would not let me use just the “true” in the comparison.  Ah, isn’t it great that LINQ is so simple?

Don’t try, don’t catch

Have you ever had a situation where all of those nested try/catch blocks just get in your way when trying to chase down a problem? I just hate that.

Luckily, in Visual Studio 2008 (and other versions, I am sure), there is a handy dandy way to disable all of the try/catch blocks when you run the application in debug mode from the IDE.  Just go to the Debug menu, select Exceptions, click the box under the Thrown column for Common Language Runtime Exceptions (or others if that is what you are looking for), and click OK.  Now when the code has a problem, you see it right away instead of trying to work backwards through nested try/catch blocks in different classes and modules.

Just don’t forget to put it back to the way it was when you are done. I am not a huge fan of try/catch blocks, but their normal use definitely has its place.

2010 Central Ohio Day of .NET

A co-worker and I attended the Central Ohio Day of .NET on June 5, 2010. There was quite a bit of good content at the conference, which is a real tribute to the organizers, volunteers, and presenters.

The highlights of my day were sitting in on Matt Casto’s regular expressions talk, Phil Japikse’s M-V-VM primer, discussing the etymology of the MongoDB project with Sam Corder (I still say it was named such after the character in Blazing Saddles), Michael Eaton’s talk on WPF, and Parag Joshi’s demonstration of XNA/Windows Phone 7 game development.